
Lab 1 - Setting Up Your Environment
In this lab, you will focus on setting up your environment which includes two virtual machines (VMs) that you will use throughout the rest of the semester. Be sure to follow the instructions carefully, and use the internet to clarify or look up information you do not know. Please don't hesitate to ask me questions as well! Each stage represents one part of the lab. Please be sure to show me that you're completion of each stage in order to get checked off for that part of the lab.
Expected Outcomes
- Ubuntu server and OPNSense are installed and running
- Ubuntu is layered behind OPNSense from the "external" network
- SSH is configured on your Ubuntu machine and accessible from outside OPNSense
Stage 1 - Accessing Proxmox
You will be hosting your virtual machines (VMs) on the School of Computing servers using a virtualization management software called Proxmox. Logging into Proxmox requires a CS account, which you should have verified access to back in Lab 1. If you do not yet have a CS account, please let me know.
Proxmox is accessible at the following URL: https://10.10.129.101:8006
In order to access the above URL, you must either use one of the computers in the lab, or have your personal device be connected to the School of Computing VPN.

Once you visit the Proxmox URL, you should be presented with the above screen. Your username will be your Southern.edu username without the @southern.edu portion at the end, and the password will be the password you set when first logging into the CS account. Please make sure that the realm is set to cs, and not one of the other options.
Once you login, press ok if you're presenting with a "no valid subscription" message, or alternatively refresh the page if clicking ok does not appear to get rid of the message.
Stage 2 - Installing and configuring OPNSense
In this stage, you'll create the OPNSense VM. This machine will act as the "router" for your future private network you'll be setting up later on in the lab. To do so, follow these steps:
1. Click Create VM on the top right of the page in Proxmox
2. Next, you should see the following box appear:
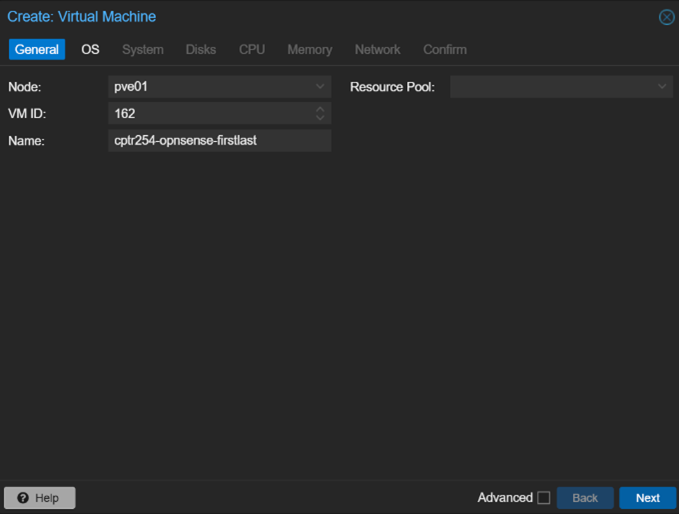
- Set the name field to cptr254-opnsense-firstnamelastname
- For example, if your name is Bob Ross, the server name would be cptr254-opnsense-bobross
- Set the resource pool to the pool matching your Southern username. Let me know if you do not appear to have one.
- Leave the rest of the fields as is, and click next
3.